 打印详情处理方案
# 局部打印详情原理与实现分析
员工详情打印逻辑:
- 以表格的形式展示员工详情
- 打印详情表格
其中 以表格的形式展示员工详情 部分我们需要使用到 el-descriptions (opens new window) 组件
而 打印详情表格 的功能就是建立在展示详情页面之上的
大家知道,当我们在浏览器右键时,其实可以直接看到对应的 打印 选项,但是这个打印选项是直接打印整个页面,不能指定打印页面中的某一部分的。所以说 打印是浏览器本身的功能,但是这个功能存在一定的小缺陷,那就是 只能打印整个页面
我们想要实现 详情打印,在详情表格基础之上指定打印具体的某一块视图,而这个功能已经有一个第三方的包 vue-print-nb (opens new window) 帮助我们进行了实现
步骤:
- 获取员工详情数据
- 在员工详情页面,渲染详情数据
- 利用 vue-print-nb (opens new window) 进行局部打印
# 业务落地:获取展示数据
在
api/user-manage中定义获取用户详情接口/** * 获取用户详情 */ export const userDetail = (id) => { return request({ url: `/user-manage/detail/${id}` }) }1
2
3
4
5
6
7
8在
views/user-info中根据id获取接口详情数据,并进行国际化处理<script setup> import { userDetail } from '@/api/user-manage' import { watchSwitchLang } from '@/utils/i18n' import { defineProps, ref } from 'vue' const props = defineProps({ id: { type: String, required: true } }) // 数据相关 const detailData = ref({}) const getUserDetail = async () => { detailData.value = await userDetail(props.id) } getUserDetail() // 语言切换 watchSwitchLang(getUserDetail) </script>1
2
3
4
5
6
7
8
9
10
11
12
13
14
15
16
17
18
19
20
21因为用户详情可以会以组件的形式进行呈现,所以对于此处我们需要得到的
id,可以通过 vue-router Props 传参 (opens new window) 的形式进行指定路由表
{
    path: '/user/info/:id',
    name: 'userInfo',
    component: () => import('@/views/user-info/index'),
    props: true,
    meta: {
    	title: 'userInfo'
          }
}
1
2
3
4
5
6
7
8
9在
views/user-manage中传递用户id<el-button type="primary" size="mini" @click="onShowClick(row._id)" > {{ $t('msg.excel.show') }} </el-button> /** * 查看按钮点击事件 */ const onShowClick = id => { router.push(`/user/info/${id}`) }1
2
3
4
5
6
7
8
9
10
11
12
13
14
# 业务落地:渲染详情结构
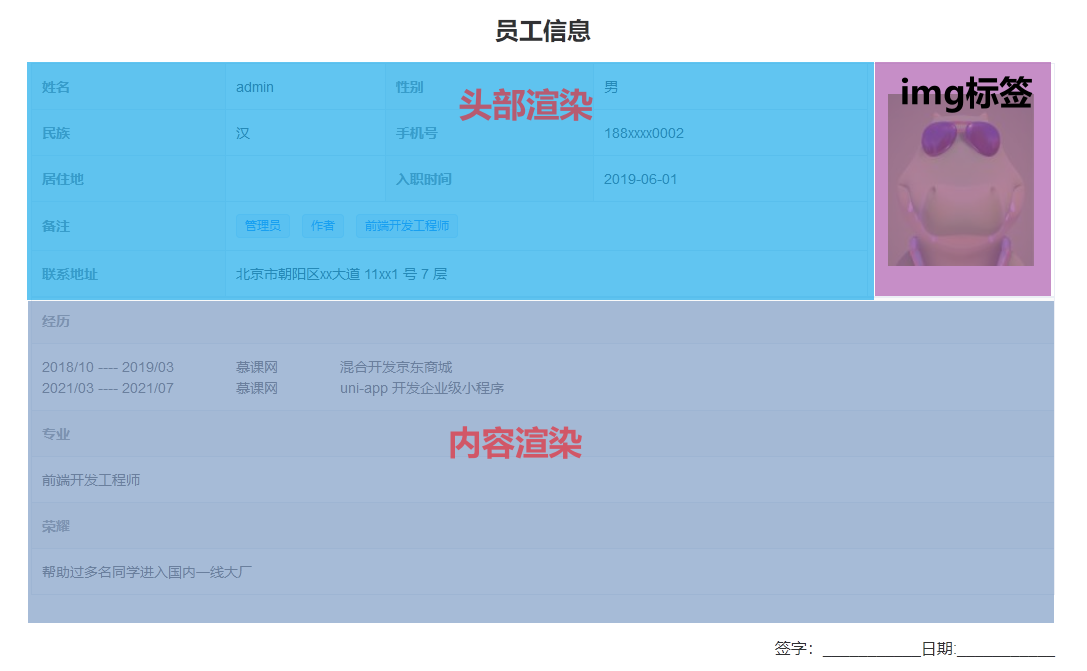
渲染用户详情结构我们需要借助 el-descriptions (opens new window) 组件,只不过使用该组件时我们需要一些小的技巧
因为 el-descriptions (opens new window) 组件作用为:渲染描述列表。但是我们想要的包含头像的用户详情样式,直接利用一个 el-descriptions (opens new window) 组件并无法进行渲染,所以此时我们需要对多个 el-descriptions (opens new window) 组件 与 img 标签进行配合使用
<template>
  <div class="user-info-container">
    <el-card class="print-box">
      <el-button type="primary">{{ $t('msg.userInfo.print') }}</el-button>
    </el-card>
    <el-card>
      <div class="user-info-box">
        <!-- 标题 -->
        <h2 class="title">{{ $t('msg.userInfo.title') }}</h2>

        <div class="header">
          <!-- 头部渲染表格 -->
          <el-descriptions :column="2" border>
            <el-descriptions-item :label="$t('msg.userInfo.name')">{{
              detailData.username
            }}</el-descriptions-item>
            <el-descriptions-item :label="$t('msg.userInfo.sex')">{{
              detailData.gender
            }}</el-descriptions-item>
            <el-descriptions-item :label="$t('msg.userInfo.nation')">{{
              detailData.nationality
            }}</el-descriptions-item>
            <el-descriptions-item :label="$t('msg.userInfo.mobile')">{{
              detailData.mobile
            }}</el-descriptions-item>
            <el-descriptions-item :label="$t('msg.userInfo.province')">{{
              detailData.province
            }}</el-descriptions-item>
            <el-descriptions-item :label="$t('msg.userInfo.date')">{{
              $filters.dateFilter(detailData.openTime)
            }}</el-descriptions-item>
            <el-descriptions-item :label="$t('msg.userInfo.remark')" :span="2">
              <el-tag
                class="remark"
                size="small"
                v-for="(item, index) in detailData.remark"
                :key="index"
                >{{ item }}</el-tag
              >
            </el-descriptions-item>
            <el-descriptions-item
              :label="$t('msg.userInfo.address')"
              :span="2"
              >{{ detailData.address }}</el-descriptions-item
            >
          </el-descriptions>
          <!-- 头像渲染 -->
          <el-image
            class="avatar"
            :src="detailData.avatar"
            :preview-src-list="[detailData.avatar]"
          ></el-image>
        </div>
        <div class="body">
          <!-- 内容渲染表格 -->
          <el-descriptions direction="vertical" :column="1" border>
            <el-descriptions-item :label="$t('msg.userInfo.experience')">
              <ul>
                <li v-for="(item, index) in detailData.experience" :key="index">
                  <span>
                    {{ $filters.dateFilter(item.startTime, 'YYYY/MM') }}
                    ----
                    {{ $filters.dateFilter(item.endTime, 'YYYY/MM') }}</span
                  >
                  <span>{{ item.title }}</span>
                  <span>{{ item.desc }}</span>
                </li>
              </ul>
            </el-descriptions-item>
            <el-descriptions-item :label="$t('msg.userInfo.major')">
              {{ detailData.major }}
            </el-descriptions-item>
            <el-descriptions-item :label="$t('msg.userInfo.glory')">
              {{ detailData.glory }}
            </el-descriptions-item>
          </el-descriptions>
        </div>
        <!-- 尾部签名 -->
        <div class="foot">{{ $t('msg.userInfo.foot') }}</div>
      </div>
    </el-card>
  </div>
</template>

<style lang="scss" scoped>
.print-box {
  margin-bottom: 20px;
  text-align: right;
}
.user-info-box {
  width: 1024px;
  margin: 0 auto;
  .title {
    text-align: center;
    margin-bottom: 18px;
  }
  .header {
    display: flex;
    ::v-deep .el-descriptions {
      flex-grow: 1;
    }
    .avatar {
      width: 187px;
      box-sizing: border-box;
      padding: 30px 20px;
      border: 1px solid #ebeef5;
      border-left: none;
    }
    .remark {
      margin-right: 12px;
    }
  }
  .body {
    ul {
      list-style: none;
      li {
        span {
          margin-right: 62px;
        }
      }
    }
  }
  .foot {
    margin-top: 42px;
    text-align: right;
  }
}
</style>
2
3
4
5
6
7
8
9
10
11
12
13
14
15
16
17
18
19
20
21
22
23
24
25
26
27
28
29
30
31
32
33
34
35
36
37
38
39
40
41
42
43
44
45
46
47
48
49
50
51
52
53
54
55
56
57
58
59
60
61
62
63
64
65
66
67
68
69
70
71
72
73
74
75
76
77
78
79
80
81
82
83
84
85
86
87
88
89
90
91
92
93
94
95
96
97
98
99
100
101
102
103
104
105
106
107
108
109
110
111
112
113
114
115
116
117
118
119
120
121
122
123
124
125
126
127
128
129
# 业务落地:局部打印功能实现
局部详情打印功能我们需要借助 vue-print-nb (opens new window)
npm i [email protected]
在
views/user-info中,指定printLoading<el-button type="primary" :loading="printLoading">{{ $t('msg.userInfo.print') }}</el-button> // 打印相关 const printLoading = ref(false)1
2
3
4
5
6在
views/user-info中,在创建打印对象const printObj = { // 打印区域 id: 'userInfoBox', // 打印标题 popTitle: 'imooc-vue-element-admin', // 打印前 beforeOpenCallback(vue) { printLoading.value = true }, // 执行打印 openCallback(vue) { printLoading.value = false } }1
2
3
4
5
6
7
8
9
10
11
12
13
14在
views/user-info中,指定打印区域id匹配<div id="userInfoBox" class="user-info-box">1vue-print-nb (opens new window) 以指令的形式存在,所以我们需要创建对应指令
新建
directives文件夹,创建index.js写入如下代码
import print from 'vue3-print-nb'

export default app => {
  app.use(print)
}
1
2
3
4
5
6在
main.js中导入该指令import installDirective from '@/directives' installDirective(app)1
2在
views/user-info中,将打印指令挂载到el-button中<el-button type="primary" v-print="printObj" :loading="printLoading">{{ $t('msg.userInfo.print') }}</el-button>1
2
3
# 局部打印功能总结
核心逻辑:
- 以表格的形式展示员工详情
- 打印详情表格
第一部分使用 el-descriptions (opens new window) 组件配合一些小技巧即可实现
而局部打印功能则需要借助 vue-print-nb (opens new window) 这个第三方库进行实现